Welcome
Subscribe today for some amazing stories and content from our expedition team or find an outfitter for your next adventure.

Subscribe today for some amazing stories and content from our expedition team or find an outfitter for your next adventure.
A raft
Several camstraps
A modern flipline
A raft
Rigging your boat to climb back on the raft
Safety in a flip scenario
Building a training system to prepare you to flip
In this lesson, Trevor is discussing how to recover from a flip. Understanding what comes next when the boat is upside down plays an important role in determining what the day’s experience will be like for you and your crew. Everything comes down to training and building systems to set yourself up for success when you do inevitably flip.
Boaters talk a lot about rigging to flip, but what does that practically mean for a newer boater? The most important element in preparing for a flip is to make sure you can set yourself up for success when you right the boat. In our video on getting back into the raft, Kailee discusses building a ladder system with rigging which will allow you to quickly get back into the boat. This same principle applies when the raft is upside down.
To understand what you need to do to rig the raft first inflate your boat and flip it over. From there try to figure out how you can climb onto your boat. Is the floor laced in with flaps that easily allow you to get a hand hold and pull yourself up? If so, great you are all set, but if your floor is super slick then you are going to need something to assist you.
One option that boaters often use is a strap running across the drain holes of your raft that you can utilize to help pull yourself onto the flipped boat. This strap usually goes from a d-ring to a set of drain holes and should be as tight as possible. This can help create something to help you pull yourself up, however it does introduce several hazards into the equation. The first hazard is the potential for entrapment since the strap will create a several foot loop on the floor that a limb can get caught in. The second hazard comes when you are running rocky or low volume rivers since rocks and debris can snag the strap and stop your boat dead in the middle of a rapid.
Since the potential for entrapment and snags is so high we are not a fan of this system because it generally violates the clean principal. If you are big water boating though, the entrapment potential may be preferable to a long swim since the snag hazard is largely mitigated by the high volume of flow in the river.
A secondary option is running a small loop of either tubular webbing or a camstrap with the buckle on the inside of the raft through the drain holes. If you choose to utilize this method you will need to make sure there is enough room for part of your hand to slip into to pull yourself up. This can help reduce the potential for snags on the river by reducing the size and length of strapping on the underside of your boat. This can also help to reduce the potential for entrapment if you keep the loops large enough to grab, but small enough that wrist likely will not fit in the loops.
One of the drawbacks to this system is that the bottom of the raft is still not clean and could get snagged on a branch. Another drawback is that the loops may not be ideally positioned for all boaters who may be in your boat. Taller boaters will have an easier time when the straps are farther away, while smaller paddlers may not be able to reach the strap at all. Utilizing cam webbing may be more advantageous since it has a lower working load limit so it may be easier to snap off if you do become snagged thus freeing the boat more readily. The issues that rigging underside straps present is something that every boater will have to weigh individually for whatever section of river that they choose to run.
Regardless of your rigging system you need to have a mental system for how you recover from a flip when it happens. Having a system in place helps you to figure out what you need to do and when you need to do it after you flip. Additionally, having a mental system in place allows you to train continuously to be prepared for a flip. Our preferred system is as follows:
Swim to your boat - Preferably on either the bow or stern since it is the closest to the water
Place your paddle on the flipped boat
Mount the flipped raft
Count your swimmers visibly and try to make contact to verify they are ok
-if you are swimmer- Look back to your raft and make contact with your crew and watch to see where the other swimmers are
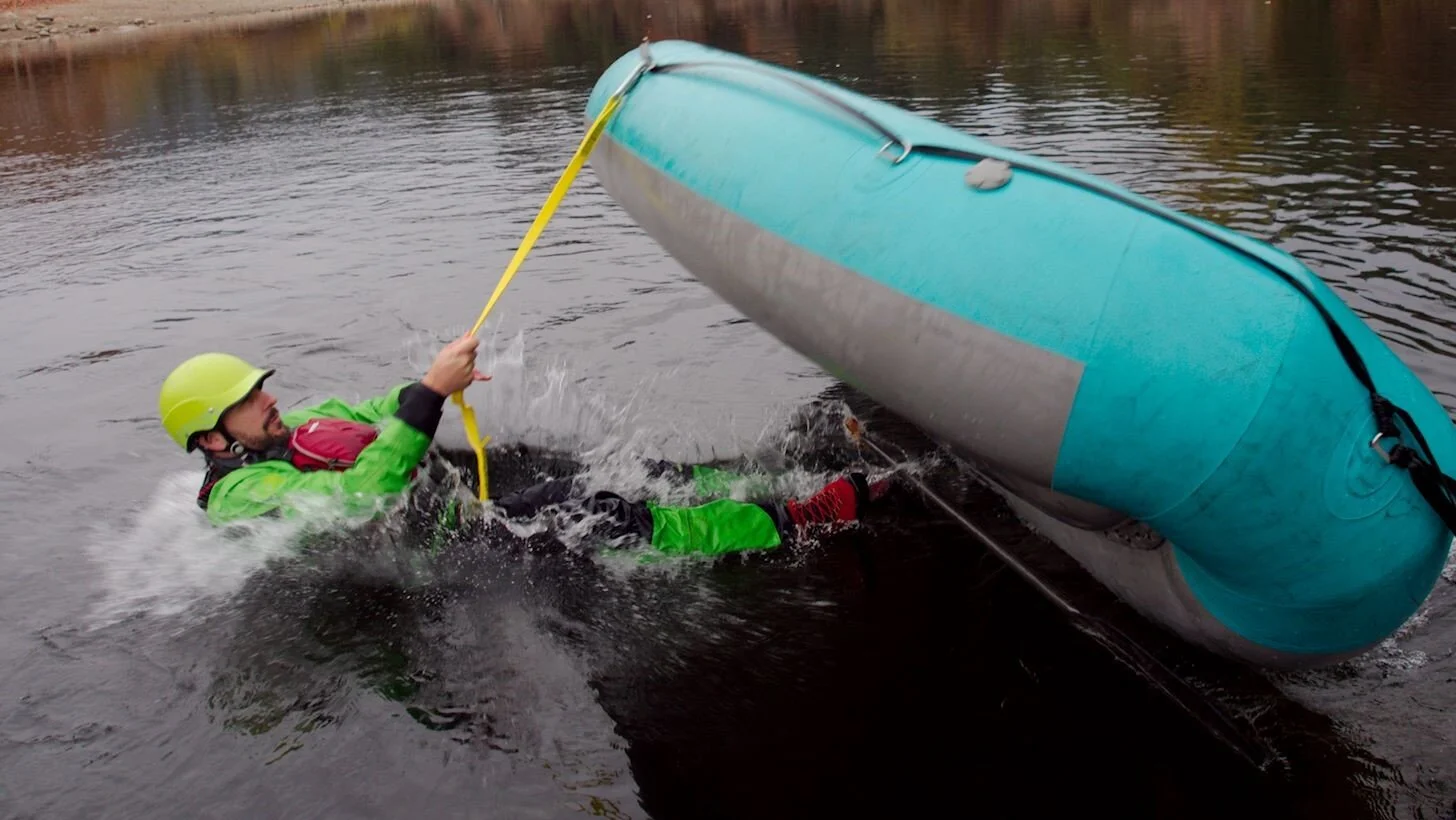
Get out your flip line
Attach the flip line to as close to the middle of the long side of the boat as possible
Look over your shoulder to spot the landing and verify the landing is clear of hazards
Pull the raft over while maintaining control of your paddle
Stow your paddle in the raft and climb in so you can control the boat when you get in
Recover your people and equipment
Utilizing all of these steps and training with them will allow you to create a training plan focused around what you need to do when you flip. The next step is to practice every trip.
The 2-minute flip challenge is an International Rafting Federation standard for their assessment system, however it creates a fantastic training opportunity as well as a friendly competition between fellow boaters. This challenge starts with a paddler in the water and time begins as soon as you touch the raft. The raft starts right side up and goes as follows:
Mount the right side up raft
Flip the raft upside down
Follow steps 1 - 10 above
Time stops when you are successfully in the righted raft. The minimum standard for this is 2 minutes if you are attempting an IRF certification, however the 2 minute standard is a good standard to hold yourself to when you are on the water because it generally means you can clean up your mess before any other boaters need to get involved. This challenge really is a fantastic training tool for both private boaters and commercial guides.
Since we have started discussing the Clean Principal in more depth we have spent more time evaluating the issues with fliplines that boaters carry. There are several safety concerns with “classic fliplines” which we often see raft guides wearing around their waist. Your classic flipline is a loop of tubular webbing attached around the waist with a carabiner. We need to emphasize that this is an extremely dangerous manner in which to attach a flipline to your body. There is no quick release on this and no way to quickly extricate yourself if you become entrapped. Additionally, the working load limit of tubular webbing is significantly higher than the resistance that your bones and boy can offer thus your body is more likely to break before the flipline does. This introduces a serious safety hazard into any river scenario.
As an alternative we are focused on the Modern Flipline which we have discussed specifically in it’s own article, however the basic modern flipline utilizes a rabbit runner and 1 carabiner. The rabbit runner is a piece of strong webbing with sewn loops on either end. In one of these loops you will want to have an auto locking carabiner for easy one-handed operation. For an added layer of safety you will want to store this rabbit runner in either your PFD or in a special pouch on your waist throw bag.